
What is a Compound Microscope?
A compound microscope is an optical instrument that uses two sets of lenses—an objective lens and an eyepiece lens—to magnify very small objects such as cells, bacteria, and microorganisms that cannot be seen with the naked eye. It is widely used in schools, laboratories, medical centers, and research facilities for detailed observation and study.
Principle of the Compound Microscope
Basic Working Principle:
A compound microscope works on the principle of magnification and resolution.
The objective lens creates a real and enlarged image of the specimen.
The eyepiece lens magnifies that image again.
The final image looks larger and inverted when seen through the eyepiece.
Formula:
Magnification = Objective Power × Eyepiece Power
Example: If your eyepiece is 10× and your objective lens is 40×, the total magnification is 400×.
Importance of the Compound Microscope in Science
The compound microscope is a crucial instrument in science because it allows us to view objects and life forms that are too small to be seen in detail by the unaided human eye, including cells, bacteria, and other minute life forms. Without the compound microscope, we would not know the function of the smallest components of living beings. Most scientists and students of science utilize the compound microscope as a way of inspecting both the structure and function of cells. The device can reveal what each region of a cell looks like and show how each component contributes to the function of the body. For example, when looking at blood through a compound microscope, one may see red blood cells and white blood cells, which help to demonstrate how a variety of components and shapes contribute to both the structure and function of living organisms.
Difference Between Compound Microscope and Simple Microscope
| Feature | Compound Microscope | Simple Microscope |
|---|---|---|
| Number of Lenses | Uses two lens systems (objective and eyepiece) | Uses only one lens |
| Magnification Power | High magnification, up to 1000× | Low magnification, usually up to 10× |
| Image Clarity | Produces detailed and clear images | Limited clarity |
| Type of Specimens | Used to observe cells, bacteria, and microorganisms | Used to view larger objects like insects or text |
| Working Principle | Objective lens forms an enlarged image which is further magnified by the eyepiece | Single lens directly magnifies the object |
| Light Source | Uses a built-in light source or mirror | Usually uses natural light |
| Usage Areas | Schools, colleges, laboratories, research centers | Reading, basic observation |
| Complexity | More complex structure | Simple design |
| Cost | More expensive | Less expensive |
| Example | Laboratory compound microscope | Magnifying glass |
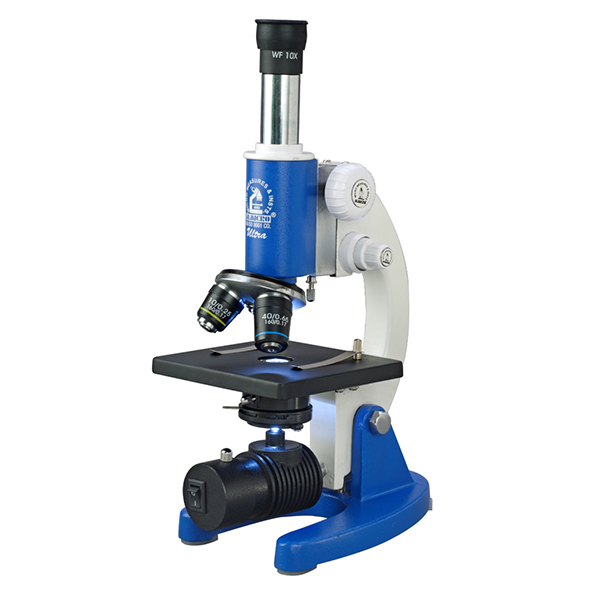
Parts of a Compound Microscope
Understanding the parts of a compound microscope helps you use it correctly. Each part plays a specific role in magnification and image clarity.

Parts of a Compound Microscope
| Part | Function |
|---|---|
| Eyepiece (Ocular Lens) | Used to view the magnified image; usually provides 10× magnification |
| Objective Lenses | Primary lenses that provide different magnifications such as 4×, 10×, 40×, and 100× |
| Revolving Nosepiece | Holds the objective lenses and allows easy switching between them |
| Stage | Flat platform where the slide or specimen is placed |
| Stage Clips | Hold the slide firmly in position on the stage |
| Condenser | Concentrates light onto the specimen for clear visibility |
| Iris Diaphragm | Controls the amount of light passing through the specimen |
| Light Source / Mirror | Provides illumination to observe the specimen |
| Coarse Adjustment Knob | Used for rough focusing by moving the stage up and down |
| Fine Adjustment Knob | Used for precise and sharp focusing of the specimen |
| Arm | Supports the upper parts of the microscope and is used to carry it |
| Base | Provides stability and supports the entire microscope |
Working of Compound Microscope
Step-by-Step Process
- Place the specimen slide on the stage.
- Light passes through the specimen.
- The objective lens collects light and forms a real, inverted image.
- The eyepiece lens magnifies this image again.
- You see a larger, inverted, and detailed final image.
This process shows how two sets of lenses work together to provide magnification. The compound microscope ray diagram illustrates this path of light clearly.
Image Characteristics
- The image is real and inverted.
- It has high magnification, usually between 40× and 2000×.
- The image is 2D and detailed.
- This makes the compound microscope suitable for studying thin biological samples like cells and tissues.
Diagram of Compound Microscope

Compound Microscope Diagram Explained
Compound Microscope Diagram
A labeled compound microscope diagram helps you understand how light travels through the instrument.
Key parts shown in the diagram:
- Eyepiece (ocular lens)
- Objective lenses
- Revolving nosepiece
- Stage
- Condenser
- Iris diaphragm
- Light source or mirror
- Coarse and fine adjustment knobs
Caption:
Figure: Labeled diagram of a compound microscope showing parts and working.
The easy simple compound microscope diagram is especially helpful for Class 12 biology students.
Magnification Formula of a Compound Microscope
The magnification of a compound microscope is calculated by multiplying the magnification of the objective lens with the magnification of the eyepiece lens.
Formula:
Total Magnification = Objective Lens Magnification × Eyepiece Lens Magnification
Example:
If the objective lens is 40× and the eyepiece lens is 10×, then:
Total Magnification = 40 × 10 = 400×
Working of a Compound Microscope (Step-by-Step)
- Place the specimen slide on the stage.
- Light passes through the condenser and specimen.
- The objective lens forms a real, inverted image.
- The eyepiece magnifies the image further.
- You see a large, clear, inverted image.
Image Characteristics
- High magnification (40× to 2000×)
- 2D image
- Fine cellular details visible
This makes it ideal for thin biological samples.
When Should You Use a Compound Microscope?
Use a compound microscope when:
- The specimen is thin and transparent
- You need high magnification
- You are studying cells, bacteria, blood, or tissues
Do not use it for:
- Thick specimens
- 3D surface observation
- Nanometer-level resolution (use electron microscope instead)
Difference Between Compound Microscope and Simple Microscope
| Feature | Compound Microscope | Simple Microscope |
|---|---|---|
| Lenses | Two (objective + eyepiece) | One |
| Magnification | Up to 1000× | Up to 10× |
| Image Quality | High clarity | Limited |
| Usage | Cells, bacteria | Text, insects |
| Cost | Higher | Lower |
Uses of Compound Microscope
The compound microscope has many uses in different fields.
In Biology and Medicine
- Used for studying cells, bacteria, and protozoa.
- Helps in tissue and blood analysis in pathology labs.
- Supports medical research for disease identification.
Doctors and researchers use compound microscopes to see how cells behave and how diseases spread at the microscopic level.
In Education
- Helps students in schools and colleges perform experiments.
- Teaches structure and function of cells.
- Used widely in class 12 biology practical’s.
The compound microscope for students is available at various prices. A basic model is affordable for educational use. The compound microscope price varies depending on features like magnification and camera compatibility.
In Research and Industry
- Used for material testing and chemical analysis.
- Helps in forensic laboratories for evidence study.
- Supports quality control in manufacturing and pharmaceuticals.
Researchers depend on the compound microscope for clear views of materials and structures at the micro-level.
Advantages and Limitations
Advantages
- Provides high magnification and resolution.
- Easy to use and portable.
- Costs less than electron microscopes.
- Suitable for classrooms, labs, and research centers.
A compound microscope is ideal for beginners and professionals who need detailed magnified images without high expense.
Limitations
- Cannot produce 3D images.
- Limited resolution, around 200 nanometers.
- Requires proper light and focus for clear images.
- Sensitive to vibrations and dust.
The compound microscope class 12 students use in labs demonstrates these limitations during practical sessions. Proper handling and maintenance help maintain accuracy and image quality.
Modern Developments in Compound Microscopes
New versions of the compound microscope include digital and USB microscopes. They allow you to connect to computers or smartphones to capture and share images.
- Digital Compound Microscope: Displays the image on a screen.
- Trinocular Compound Microscope: Has a third tube for a camera attachment.
- Fluorescent Compound Microscope: Uses fluorescent light for advanced biological studies.
These new models make microscopy faster and more convenient. The compound microscope diagram of digital types shows how the optical path integrates with electronic imaging.
How to Choose a Compound Microscope
When you buy a compound microscope, check these points:
- Magnification: Choose models with 40× to 1000× magnification for general biology.
- Build Quality: Look for metal frames for stability.
- Light Source: LED light sources last longer and use less power.
- Objective Lenses: Select multiple objectives for flexibility.
- Compound Microscope Price: Educational models are cheaper, while research microscopes cost more due to precision lenses.
Always compare features before purchasing. The compound microscope price in 2025 depends on brand, magnification power, and camera compatibility.
Compound Microscope Drawing Practice for Students
Students often draw the compound microscope diagram in class 12 biology exams. To practice:
- Start with the base and arm.
- Add the stage and light source.
- Draw the objective and eyepiece lenses.
- Label all parts clearly.
Use simple lines and label each part neatly. The easy simple compound microscope diagram helps students remember the parts and working process.
Summary of Compound Microscope Function
The compound microscope uses two lenses to create a large and clear image of tiny specimens.
- The objective lens forms the first magnified image.
- The eyepiece lens magnifies it further.
- The final image is large, inverted, and clear.
The compound microscope ray diagram explains how light travels through lenses to create this magnified image.
Frequently Ask Questions
The main parts of a compound microscope include the eyepiece, objective lenses, stage, condenser, diaphragm, light source, coarse adjustment knob, and fine adjustment knob. Each part plays an important role in magnifying and focusing the specimen.
The main parts of a compound microscope include the eyepiece, objective lenses, stage, condenser, diaphragm, light source, coarse adjustment knob, and fine adjustment knob. Each part plays an important role in magnifying and focusing the specimen.
The compound microscope was invented by Zacharias Janssen and his father Hans Janssen around the year 1590. They were Dutch spectacle makers who discovered that combining multiple lenses could greatly increase magnification.
The magnification of a compound microscope is calculated using the formula:
Total Magnification = Objective Lens Magnification × Eyepiece Lens Magnification
A compound microscope works by passing light through the specimen placed on the stage. The objective lens first magnifies the image, and then the eyepiece lens magnifies it further, producing a clear and enlarged view of the specimen.
Thin and transparent specimens such as plant cells, animal cells, bacteria, blood cells, and microorganisms can be observed clearly using a compound microscope.